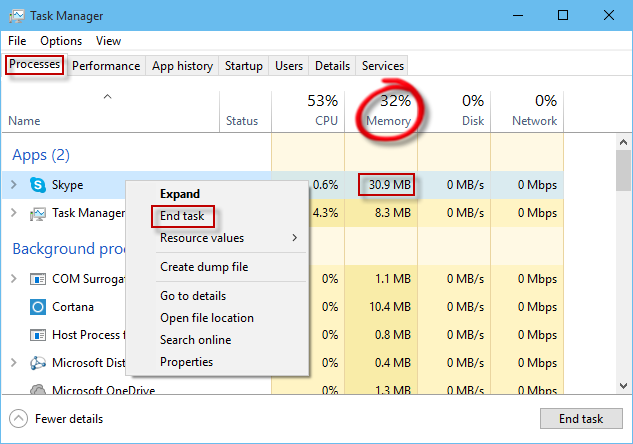
This is a very simple way to kill an application by code under Windows. Don’t forget to add System.Diagnostics in the Using section. public void KillApp(string appName) { try { foreach (Process proc in Process.GetProcessesByName(appName)) proc.Kill(); } catch (Exception ex) { //TODO… } } Enjoy!
C# – Set the Wallpaper by code

There is no simple way to set the wallpaper. We have to use a Windows DLL to do that. And this DLL is able to set the wallpaper only if the image is a BMP. So we have to convert it first. using Microsoft.Win32; using System.Drawing; using System.Drawing.Imaging; using System.IO; using System.Runtime.InteropServices; namespace WindowsStarter { […]
WPF – Missing Underscore with Label or CheckBox
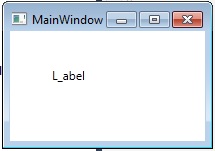
Did you ever have a missing underscore with WPF? If you have a Label or a Checkbox containing underscores, the first underscore will not be displayed on screen. It is called the RecognizeAccessKey. Which allows you to reach the control with you keyboard by pressing ALT and the first lettre following the first underscore. So […]
WPF – MVVM – Get filtered values from a GridView
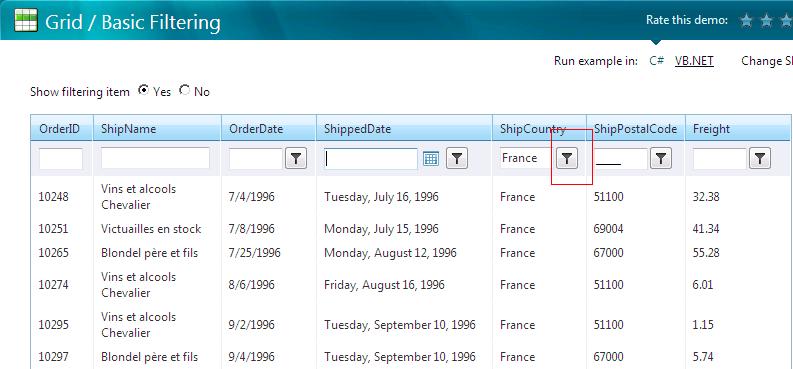
The goal of this article is to show how to get the filtered items from a GridView (here we will use Telerik RadGridView, but it should be the same for any Grid). This case is really useful if you need to apply some calculation on a filtered subset of the Data you’re displaying, while you’re […]
WPF – Add a Watermark to a native WPF TextBox
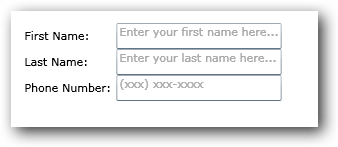
This is how to add a Watermark to a native WPF TextBox without using a control from another toolkit. The concept is to create a Style which will add a new property (called Tag) for your TextBoxes. The content of this Tag will be the watermark. And it will manage the events like if you […]
C# – Start any Windows application from code

To start any application by code, it pretty easy: static void Main(string[] args) { var pi = new ProcessStartInfo { FileName = “calc”, //Arguments = “…”, //RedirectStandardOutput = true, UseShellExecute = false //Allows the redirection of the ouput }; var p = Process.Start(pi); } But in that simple case, we could just do: static void […]
WPF – MVVM – Proxy Binding

Here the purpose is to be able to bind a Command on a Button which is under 2 levels of ItemsControl without using the “Ancestor” stuff. So the classic way of doing this: the following should work : <TextBlock Text=”{Binding RelativeSource={RelativeSource Mode=FindAncestor, AncestorType={x:Type Window}}, Path=DataContext.Client.Name}” /> But we can do something better and more readable. […]
How to kill all user sessions on a DB

Sometimes in SQL you need to delete some rows, delete a Table or the DB. But what if a user is still connected to it. The solution is simple, kill all the sessions on that DB with a simple script: USE master SET NOCOUNT ON DECLARE @DBName varchar(50) DECLARE @spidstr varchar(8000) DECLARE @ConnKilled smallint SET […]
WPF MultiBinding

In WPF, it’s pretty common to display differenct properties of an object as if there where one. Typycally, I have a User, which contains a FirstName and a LastName and I want them both to be displayed as one. <TextBlock> <TextBlock.Text> <MultiBinding StringFormat=”{}{0} ({1})” > <Binding Path=”User.FirstName”></Binding> <Binding Path=”User.LastName”></Binding> </MultiBinding> </TextBlock.Text> </TextBlock> Enjoy!
Create a simple REST Web Service: Step 3 – Consume the Service
In my previous post we were talking about how to create a REST web service. But now we want to build a client and consume this service. The address was http://localhost/DbUsersApi.php?action=get_user_list and the result was a JSON file: {“user_list”:[{“userid”:”D3B6F994-1DA5-47FB-8A2A-750A65AAB137″,”firstname”:”Joe”,”lastname”:”Bloggs”},{“userid”:”E19F2EC8-62B9-4C88-84DC-E0D6903177E0″,”firstname”:”John”,”lastname”:”Doe”}]} We will use a simple HTML file with Javascript. Consume the service with Javascript: Create a new file […]