Introduction
In this blog post, we will explore how to create a new queue in RabbitMQ and specify a timeout value. RabbitMQ, a widely-used message broker, allows for efficient communication between various components of a system. By setting a timeout for a queue, we can control how long messages are retained in the queue before they are discarded. In this article, we will discuss the steps to create a queue with a timeout value and highlight some important considerations.
Setting a Timeout Value for a Queue
Starting from version 3.12 of RabbitMQ, it is possible to specify a timeout value for a queue. By default, the timeout value is set to 30 minutes. However, you can customize this value according to your requirements. To set a timeout value during the creation of a queue, you need to add an “argument” that defines the desired timeout value.
Creating a Queue with a Timeout
To create a queue with a specific timeout value, you can use the RabbitMQ management console or interact with the RabbitMQ API. When defining the queue, include the “x-consumer-timeout” argument with the desired timeout value specified in milliseconds. For example, if you want to set the timeout to 1 hour, you would set the argument as follows:
arguments: x-consumer-timeout = 3600000
Code language: YAML (yaml)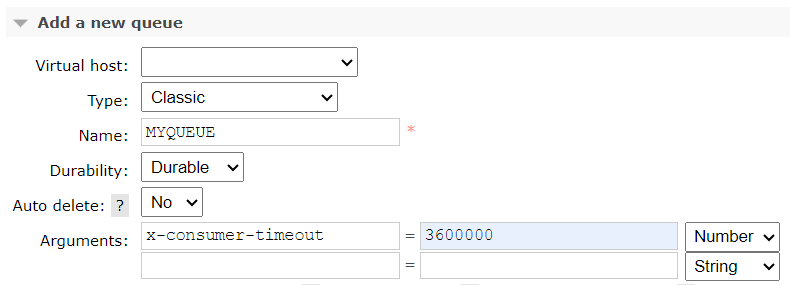
Updating the Timeout Value
It’s important to note that the timeout value can only be set during the creation of a queue. If you have an existing queue and you wish to change the timeout value, you will need to delete the queue and recreate it with the desired arguments. This is because the timeout value is a property of the queue itself and cannot be modified once the queue is created.
Configuring the Queue Type and Argument Format
When creating the queue, ensure that the queue type is set to “classic”. This ensures that the queue follows the traditional message queuing model, where messages are stored in the queue until they are consumed. Additionally, make sure to set the argument as a “Number” to correctly interpret the timeout value.
Binding the Queue to an Exchange
Once you have created the new queue with the desired timeout value, it is important to bind the queue to an exchange. Binding establishes the connection between the queue and the exchange, allowing messages to be routed to the appropriate destination. Ensure that you correctly bind the new queue to the relevant exchange to enable proper message communication.
Conclusion
In conclusion, setting a timeout value for a queue in RabbitMQ can be achieved by adding an “argument” during the queue creation process. By customizing the timeout value, you can control how long messages are retained in the queue before they are discarded. Remember to configure the queue type as “classic” and set the argument as a “Number”. If you need to update the timeout value for an existing queue, you will need to delete and recreate the queue with the desired arguments. Finally, don’t forget to bind the queue to an exchange to enable proper message routing.
By following these steps, you can effectively manage and control the retention of messages in your RabbitMQ queues.