
Hello Devz,
SQLite as a SQL Engine Database became a standard a few years ago already. As it’s name says: it’s lite, and it doesn’t require a dedicated server. Cheap and performant, what else? At the end of this simple tutorial you will be able to setup the minimum requirements to use SQLite with Entity Framework in a small ASP.Net MVC project (or WPF, …), so let’s go !
Step 1: Create your database
I used this tool: SQLiteBrowser I must confess, this is the first one I found on google 😉 But any other tool should do the job, just choose the one you feel more comfortable with.
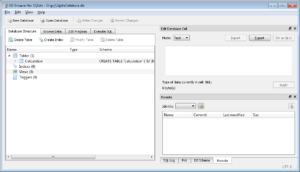
SQLite Browser
After the installation, create a new Database. The file path will be used later. So keep it somewhere. Let’s call our new database: SqliteDatabase.db. Ok, now it’s time to create our first table. Define a small entity called “Calculation”.
CREATE TABLE `Calculation` (
	`Id`	INTEGER NOT NULL UNIQUE,
	`Name`	INTEGER,
	`StartDateUtc`	TEXT,
	`Progress`	INTEGER
);
Which should look like this in the UI of SQLiteBrowser:
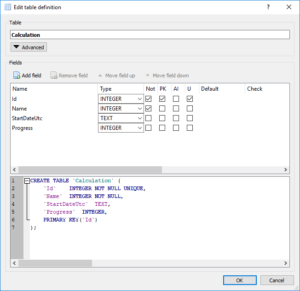
SQLite Browser edit table definition
Step 2: Create your MVC project
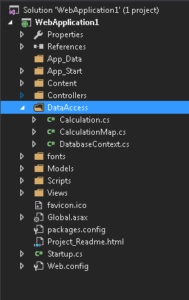
Create your ASP.Net MVC application and install SQLite via the nuget package manager
PM> Install-Package System.Data.SQLite
VisualStudio Solution Explorer
In this example, we created a folder named “DataAccess” where we’ll put the code for Step3 and 5.
Step 3: The model
The type of the date is string. Because datatype are limited in SQLite (cfr https://www.sqlite.org/datatype3.html)
    public class Calculation
    {
        public int Id { get; set; }

        public string Name { get; set; }

        public string StartDateUtc { get; set; }

        public int? Progress { get; set;}
    }
Step 4: ConnectionString
This is the connectionString used. Replace the data source by yours. (The one you create via the tool)
<add name="SQLiteConnection" providerName="System.Data.SQLite.EF6" connectionString="Data Source=C:\PRJ\SqliteDatabase.db" />
Step 5: DatabaseContext
We are almost done! Now we just have to create the context.
- The database contains only one Table, represented in the code like this: DbSet<Calculation> Calculations
- The GetConnection retrieves the information from your connection in the Web.Config
- Remove<PluralizingTableNameConvention> only remove a feature of entity framework trying to pluralize your table name.
using System.Configuration;
using System.Data.Common;
using System.Data.Entity;
using System.Data.Entity.ModelConfiguration.Conventions;

namespace WebApplication1.DataAccess
{
    public class DatabaseContext : DbContext
    {
        public DbSet<Calculation> Calculations { get; set; }

        public DatabaseContext() : base(GetConnection(), false)
        {

        }

        public static DbConnection GetConnection()
        {
            var connection = ConfigurationManager.ConnectionStrings["SQLiteConnection"];
            var factory = DbProviderFactories.GetFactory(connection.ProviderName);
            var dbCon = factory.CreateConnection();
            dbCon.ConnectionString = connection.ConnectionString;
            return dbCon;
        }

        protected override void OnModelCreating(DbModelBuilder modelBuilder)
        {
            modelBuilder.Conventions.Remove<PluralizingTableNameConvention>();
            modelBuilder.Configurations.Add(new CalculationMap());
            base.OnModelCreating(modelBuilder);
        }
    }
}
This is the mapping between your SQLite Table and your model.
    public class CalculationMap : EntityTypeConfiguration<Calculation>
    {
        public CalculationMap()
        {
            ToTable("Calculation");

            Property(p => p.Id).IsRequired().HasDatabaseGeneratedOption(DatabaseGeneratedOption.None);
            Property(p => p.Name).IsRequired();
            Property(p => p.StartDateUtc).IsOptional();

        }
    }
How to Test it?
Finally, it’s time to test what we implemented. To quickly see if your code is working, you can add this piece of code in the default HomeController. It will read the database, add a new row, and read the database again to check it has benn written correctly.
public class HomeController : Controller
{
    public ActionResult Index()
    {
        using (var context = new DatabaseContext())
        {
	    //Get the existing calculations from the db
            var intialCalculations = context.Calculations.ToList();

	    //Create a new Calculation
            var calculation = new Calculation
            {
		//Increment the Id
                Id = intialCalculations.Count() == 0 ? 1 : intialCalculations.Max(x => x.Id) + 1,
            };

	    //Give a name to our new Calculation
            calculation.Name = $"calculation {calculation.Id}";

	    //Add the new Calculation to the context
            context.Calculations.Add(calculation);

            //And save it to the db
            context.SaveChanges();

	    //Get all the calculations again from the db (our new Calculation should be there)
            var allCalculations = context.Calculations.ToList();
        }

        return View();
    }
}
Possible errors:
Issue 1
[ProviderIncompatibleException: CreateDatabase is not supported by the provider.]
Your data source is probably wrong, be sure your path is correct in your config file, e.g : “Data Source=C:\PRJ\SqliteDatabase.db”
Issue 2
[InvalidOperationException: No Entity Framework provider found for the ADO.NET provider with invariant name ‘System.Data.SQLite’. Make sure the provider is registered in the ‘entityFramework’ section of the application config file]
This line could be missing in your configuration file (inside <providers>)
<provider invariantName="System.Data.SQLite" type="System.Data.SQLite.EF6.SQLiteProviderServices, System.Data.SQLite.EF6"/>
Issue 3
‘An error occurred while executing the command definition. See the inner exception for details.’
Make sure to click on “Write changes” when you create your table. I did the mistake during the review of the post.
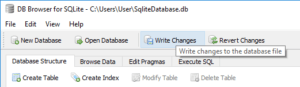
SQLite Browser Write changes
Source are available on DevOps !
https://code4noobz@dev.azure.com/code4noobz/DemoSQLite/_git/DemoSQLite
Happy coding! 🙂


[…] If you need more information about the configuration of SQLite, you can read this post. […]